I've been having a lot of fun working on the gym elements. Over the past few days, I have created:
The vestibule doorway:
Roof for the gym (still needs re-working, because it does not match the trusses very well) and skylight:
Beams, unique lanterns, bleachers, and rail for the pool:
Finally, half the balcony (to check the scale):
The balcony may turn out to be difficult because the plans don't seem to match up with each other. The original plans describe a running track, but according to photographic evidence, this was never built. Therefore, there is a single page of blueprints showing "additions and modifications" to add the balcony. This page shows a small room that is not on the blueprints for the rest of the gym. This is understandable, as the balcony was not added until about 1925, so a room could have been added between 1918 and 1925. If I cannot find photographic evidence of this room, I may need this to be another (rare!) case of artistic license.
The exterior gym windows were relatively quick to create in Blender:
... but the stairs took most of the day. The difficulty was the wood cap, which had a lot of Boolean modifiers to set up. The stairs also no longer exist, so I had to work from the original blueprints and reference photos only.
The page from the blueprints
Photo reference from the Rosemary
The stairs in Blender
The stairs imported into Unreal Engine
Ticket booth
In the photos above, the words "preview" are coming from the directional light (the sun) because I have not rebuilt the lighting in a while. I still don't know what will happen when I try to run Lightmass with the three streamed levels. There is a way to have "Precomputed Light Scenarios," so that may be the way to go.
The level blocking went a lot quicker than before, mostly because the BSP is going faster (due to the level streaming, Unreal does not have to rebuild the 1914 section too), but also because I know how to do it better. The only problem is that although Royer's Gym blueprints are more detailed, they are also more difficult to read. It is possible they were scanned from a different color paper, as there is a large amount of noise in the scan -- much more than the 1914 blueprints.
My research in 2002 revealed that the school was originally built without an athletic wing. So, in creating a model of how the school looked when it opened in 1914 cannot include this portion of the building. However, it was the pool and main entrance from the gym addition that initially struck my interest in the entire project, and historic architecture in general: my Freshman biology class was located where the pool once was, and my teacher showed me the now-hidden door where the football team used to come in from practice. The changes in the building made me want to learn more, which led me to the Champaign County Historic Archives, and ultimately to create a slide presentation, website, and the UHS: 1914 project. So, the gym addition needed to be included, but how? Additional research over the past few weeks confirmed that the school was built without a gym/pool, despite what the plans at the Historic Archives show. Only a handful of photographs show the building from this short period of it's history:
"The New Urbana High School" from the 1915 Rosemary. The big empty space on the right of the photo is where the gym was to be built.
An additional photo, taken from a postcard. The slim line of white on the far right shows that the gym addition has not yet been built, and places this photo as sometime early 1915.
This dated photo shows that in late November of 1915, construction still had not started.
By fall 1916, construction had started, as shown by this photo of the football team from the 1917 Rosemary:
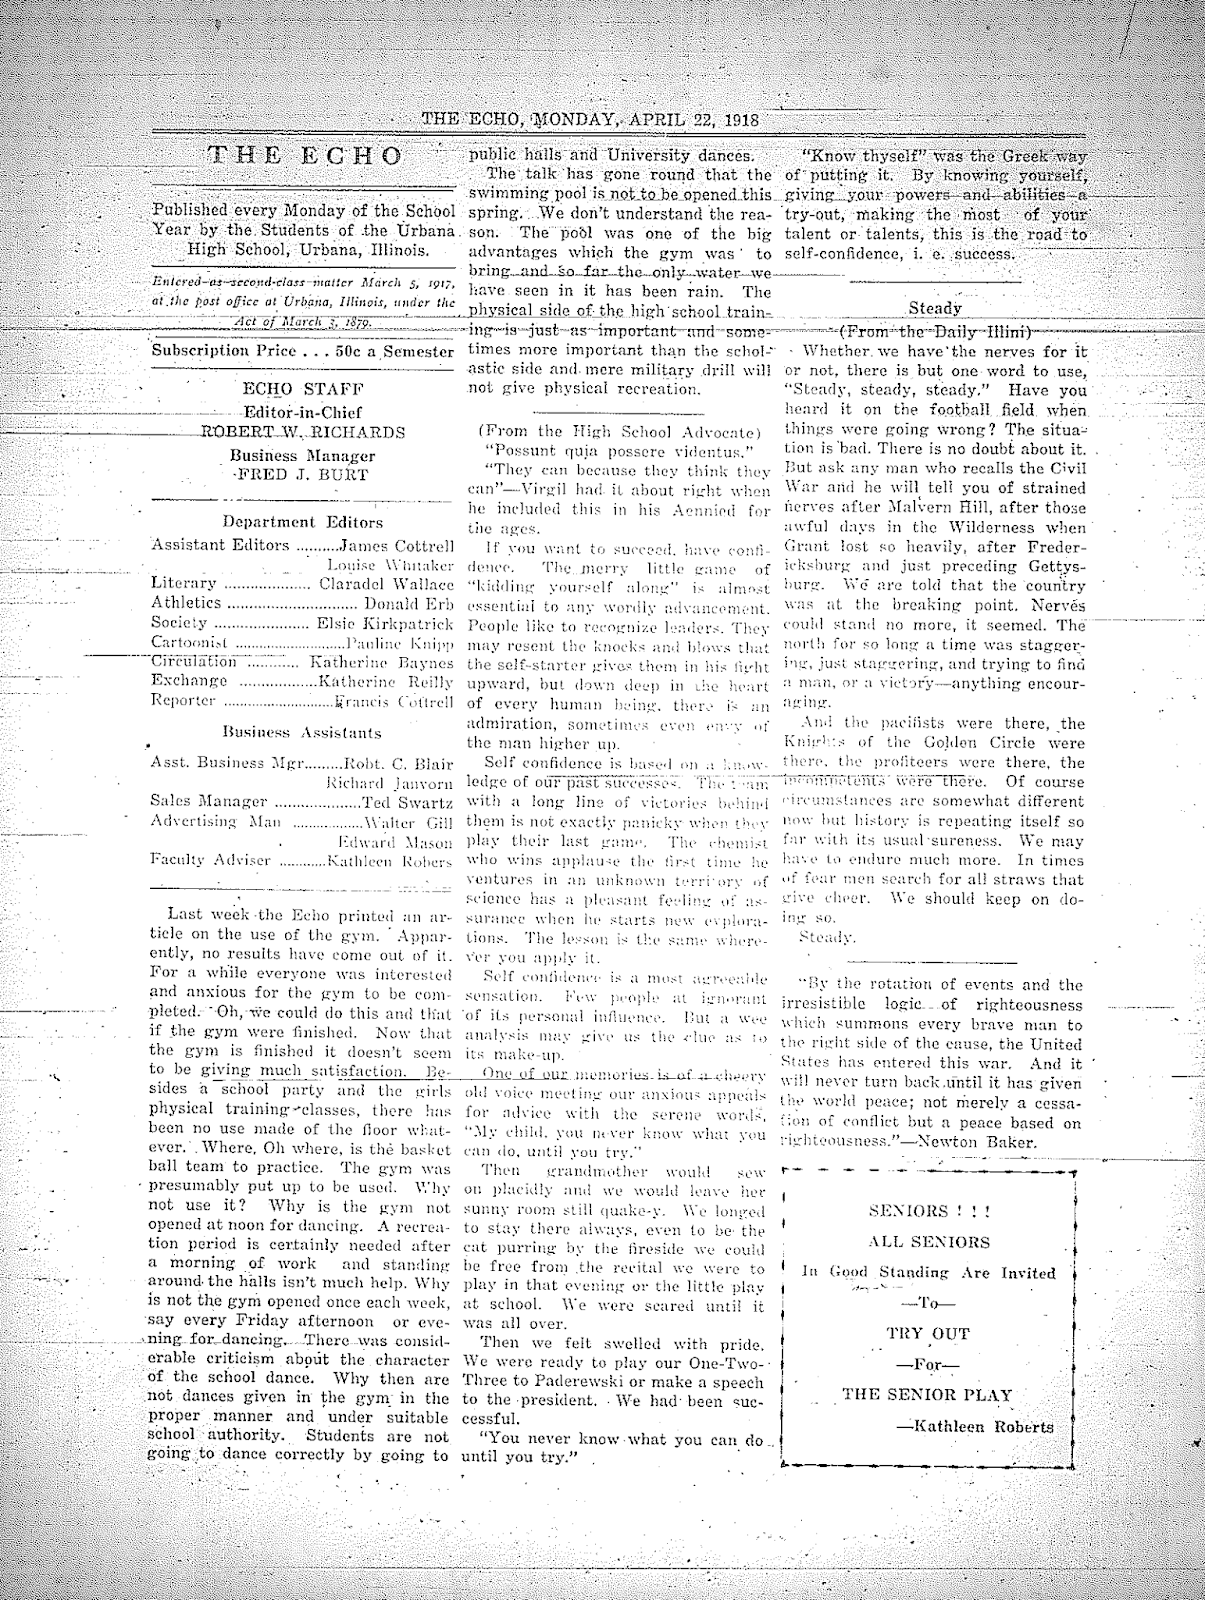
Numerous updates about the construction are included in the Echo (the school newspaper), and enough of the building was completed to warrant this cartoon:
However, an Echo from March 1918 mentions that the gym is not yet completed:
These is no subsequent mention of the building being completed, only mentions of the facilities not being used to their potential in April of 1918:
Presumably, meeting minutes from the Board of Education would clear up when the gym was first opened. I used to refer to the Gym addition as the "1916 addition" because that is when construction started, but this additional research puts the completion date as some time in the spring of 1918. There is also the added confusion that someone has written "1925" as the date in pencil on the plans for the gym addition, but that is only when the balcony was added (a subsequent blog entry for THAT!). So, the final decision will be to complete the UHS: 1914 project as-is, with the building appearing as it did in 1914, but with the option of adding the gym addition given to the player. The solution I have to this is Level Streaming. A very concise video from Mathew Wadstein gives a good explanation of how this works:
Essentially, I will have the building split into three levels. The first is the main 1914 building, but without the rear wall:
The second will be only the rear wall:
Here are the two both displayed at the same time, as they will be when viewed by the player:
The third level will be the gym portion (yet to be constructed, so no screenshot). The player will have the ability to add the gym/pool addition, and when that happens, the rear wall will also disappear. I also plan to have a "future site of" sign displayed in the 1914 version so that it is apparent what is going on.
I have been working on some minor details while preparing to work on the 1918 gymnasium addition. The small window in the principal's office (also mirrored in the superintendent's office):
While it may seem insignificant, I completed the two bands of stone trim that go around the perimeter of the building. This was hastened by the use of world-aligned textures (no re-scaling of meshes needed!):
The rear of the building used to have brick ornaments. These are now hidden by the various additions, but one is still visible in the scene shop, behind the auditorium:
Brick ornament on rear of 1914 building, hidden by 1986 addition
Brick ornament, hidden no more!
I used Blender to trace the words "gymnasium" from a photo of the gym addition:
More on the Gym addition soon! Finally, I added the brick sills that belong to the windows in the basement hallway. In terms of how these looked, I only have my personal memory as a guide, as they have all been removed through various renovations.
I have been working a lot on adding finishing trim on the building portion of The Project, so that includes some last-minute plaster details. This time, it is the long-lost plaster arch over the Manual Training door on the ground level.
I also recorded a screencast while I did the work in Blender! In the video, you will see: - tracing from the blueprints, with a flat section extruded to create a 3d form - the Boolean modifier in Blender, in which a plane is used to slice another piece of geometry - usage of the custom "world-aligned" brick materials in UE4
Photos from the Rosemary show that UHS had a generous complement of wooden folding chairs, mostly in the auditorium.
A family member happens to have a few chairs that resemble these, so I photographed one of them from several angles, and did a screencast while modeling the chair in Blender.
I decided I wanted to give full gamepad support for the playable version of the project, which means menus must be navigatable using the gamepad. UE4 does not natively support gamepad navigation through UMG (only point-and-click with a mouse), so the programming must be done manually. I watched this video (several times) to learn how to do this:
Figure 1: the programming that is called when the game starts. It displays the Main Menu, and defines actions for gamepad Up and Down buttons (in red), as well as the A button (Gamepad Face Button Bottom) to select. The nav types within the two blue functions are defined by an enumeration (not shown) that contains of two variables: main_up and main_down.
Figure 1 - Main Menu Level Blueprint
Figure 2: the designer tab for the menu widget, which I created in December. Not much to see here other than that there is an animation timeline keyed to all of the elements:
Figure 2 - Main Menu designer tab
Figure 3: the blueprint for the menu widget. There is a lot going on! At the top, starting with EventConstruct, the fade-in animation is called, and Debussy's "La cathédrale engloutie" (Sunken Cathedral) is played. Then the button appearance is set, which is referenced by functions on other tabs. On the far left, there are red OnClicked and custom Event functions. These each get their own instructions, which flow from left to right. For example, when OnClicked_Main00Explore is called, this displays the loading screen, waits a few seconds, opens the UHS_1914_building level, then removes the Main menu widget. The OnClicked events are created automatically from the Designer tab; the custom events are created by me. At the top of the blueprint, within the gray box, is the array which sets the appearance of the buttons, and at the bottom within the gray box is the index that defines each of the buttons as an integer so that the buttons change with OnMouseHover as well (usually, the Mouse Hover colors are defined on the designer tab, but then it ignores the "Update Appearance" function, so I have them both updated here). In theory, I could have cleaned up this blueprint by making each button action as a separate function, which would each be listed on separate tabs, but chose not to.
Figure 3 - Main Menu Widget blueprint
Figure 4: the function that is actually referenced on the level blueprint. It receives the gamepad navigation requests (from the level blueprint, figure 1) -- either up or down based on the nav type -- and calls additional functions based on this request.
Figure 4 - "Receive Navigation Request" function
Figure 5: the Receive Main Down function. If the player moves the joystick down or presses down on the d-pad, the Main Navigation Index is increased by +1. There are five buttons; the top button is 00, the second 01, etc. If the navigation index integer is less than 4, it adds +1. If the Navigation index integer is greater than 4, the index is returned to 0. That way, if the player has the bottom button selected (button 05), the selection loops back to the top (button 00). There is also a subtle "tick" sound played when the index is changed.
Figure 5 - "Receive Main Down" function
Figure 6: the function for Receive Main Up. It is the same as the down function, but instead of adding 1, subtracts 1. If the integer is greater than 0, then -1 (it will not be any larger than 4, according to the Receive Main Down function, figure 5). If the integer is less than 0, it is changed to 4.
Figure 6 - "Receive Main Up" function
Figure 7: the function that changes the appearance of the buttons. There is a ForEachLoop that creates an array referencing the navigation index (the integer modified in figures 5 and 6) , and sets the background of the button based on that integer (clear if false, subtle gray if true).
Figure 7 - "Update Main Nav Appearance" function
Figure 8: the function called when the gamepad A key is pressed (as defined on the level blueprint at the beginning, figure 1). This uses the navigation index integer to choose which of the custom events are called (in red on the left of the Main Menu blueprint, figure 3).
Figure 8 - "Receive Gamepad Select" function
All of these blueprints together allow the player to interact with the main menu with either a mouse or a gamepad. Whew! After spending eight hours adding this to the Main Menu, it was easy to add gamepad functionality to the pause menu within the game itself. The differences within the level are that I had to set the game as paused so that the Up/Down navigations did not make the player pawn move in the background. Otherwise, the gamepad could select invisible Pause menu items as the player navigated the map, since the functions for the pause menu navigation are available thoughout play. Also, the Pause Menu is actually created from a separate level that streams temporarily over the UHS_1914_building level. This sets the main game as paused, but also means the gamepad actions defining the pause menu navigation have to be set as "execute when paused", otherwise nothing happens. With Play-in-Editor (PIE), I was able to navigate from the Main Menu, to the building level, back to the main menu, and to the Gallery level -- all with a gamepad. Success! Then I clicked Save, and closed the editor. Enter: roadblock! Here is where the roadblock appeared: I had great success with the Main Menu's gamepad functionality, but could not get the pause menu to work after saving and re-opening the level. I got the same error I received in March from my bug report: after reloading, the variables from the designer tab disappeared from the graph side of the UMG blueprint. This not only threw a compile error to the blueprint itself, but caused the project not to be able to be packaged (export-all to a stand-alone application). In addition, not only did I have the variable for the animation disappear (the error from march), but the variables that referenced the buttons also disappeared. In a few cases, trying to fix the missing variables crashed the editor. No good! The a-ha moment came late yesterday afternoon. The question: why was the Main Menu working, but the Pause menu not working? The difference between the two situations is from where the CreateWidget is called. I had been calling the Pause menu from the FirstPersonPlayerBP (the blueprint that defines the player actions), since that is where I have successfully called the footstep sounds and the mini-map. However, the FirstPersonPlayerBP blueprint somehow negates the variables created within UMG blueprints. The Main Menu works fine because it is called not from the FirstPersonPlayerBP, but from a level blueprint for the empty Main Menu level. As soon as I switched the Pause menu to call from the level blueprint instead of the FirstPersonPlayerBP, it worked! Nearly the entire project can now be controlled both by a mouse/keyboard, and from a gamepad. To celebrate this success, I modeled a vault ceiling to add to the porch on the Gallery level:
Edit July 11: with the addition of the options menu, the entire project now has full gamepad support!


